After learning about rotation, the next step was to explore spirals. Just like circles, spirals go around and around. The difference is that with a circle, the radius always stays the same but in a spiral the radius keeps growing (or shrinking if you prefer).
We looked at two ways to make a spiral using Scratch. The first way is very similar to the program used in
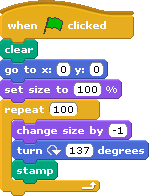
Going in Circles. The main difference is that in the repeat you change the size of the shape using the "change size by" command. In our code we used the number "-1" - the negative number makes the shape get smaller by 1% each time. You can also use a positive number and make the shape get bigger each time.
You might like to play around with Colour Gradients for this project. A colour gradient is a gradual change from one colour to another and gives the art work a feeling of depth. To create a gradient, draw a shape then select the paint bucket tool. Just below the bucket, click on one of the pictures showing a gradual change from black to white. Then pick two colours from the palette. Finally, click on a region of the picture that you want to fill with the gradient. Also don't forget to play with the position of the center of the costume.
Here are some examples that the students created:
This one uses the angle 137.507, also known as the golden angle. It can be found in sunflowers and pine cones:
Another way to make a spiral is to use the Pen commands in Scratch. You can draw any shape, for example a triangle or a square by using the "pen down", "turn" and "move" commands. To turn this into a spiral, you need to change the distance you move each time you draw a side of the shape. To do this, we use a variable which we called length. The variable is initially set to a small size like 3 and on each repeat we increase the size of the variable using the "change [variable]" command. Play around with how much the length changes each time and see what this does to the spiral.
You can also play around with how much you turn in each repeat. In the picture below, the left side of the picture turns 120 degrees - this gives us a triangular spiral. The right side of the picture turns 121 degrees each repeat. See what a difference this little change makes? Now it looks like you are drawing curves using straight lines.
Here are some examples that the students created:
This one uses a random number for the line width:
This one draws two spirals:
This one changes the pen color by 50: